Wednesday, January 30, 2013

Sweet as honeycomb


Your dentist may despise it and your dietician loathe it, but honeycomb is a childish delight all the more delicious for it’s reputation. Also known as hokey pokey, cinder toffee or puff candy, the crunchy moreish shards make the perfect dinner party gift as no one can resist its old-fashioned charm.

Photographs by Angie Lazaro Photography

Homemade honeycomb
Makes 20 pieces

300g castor sugar
150g golden syrup
pinch cream of tartar
1t white wine vinegar
1 ½ t bicarbonate of soda

Place the sugar, syrup, cream of tartar and vinegar into a saucepan. Add 5T water and stir over medium heat until dissolved. Bring mixture to the boil.

Cook until the syrup turns amber-coloured and reaches hard-crack stage or 150°C on a sugar thermometer*. Remove the pan from the heat.

Working quickly, add the bicarbonate of soda and whisk to combine. The mixture will foam up. Pour into the prepared tin and leave to cool. Turn honeycomb out and break into chunks. Store in an airtight container for 2-3 days.

TIP: be sure to use fresh bicarbonate of soda and don’t overmix the toffee once it’s added

Entertaining tip: dip shards of the honeycomb into white and dark chocolate, pile into a beautifully wrapped box and present it to guests to take home or as a hostess gift. 


*DON'T HAVE A THERMOMETER?

Boil a sugar syrup to the right stage
The best utensil for testing sugar syrup is a sugar thermometer but if you don’t have one, you can test it by dropping a small quantity into cold water and feeling the consistency:

Soft ball stage: 116 - 125°C – the syrup will form a soft, flat ball.

Hard ball stage: 126 - 135°C When a little syrup is dropped into ice water the ball that forms does not collapse as it is harder.

Hard crack stage: 146 - 155°C The ball forms is flattened between the fingers but is hard, brittle, breaks easily and not sticky. 

Sunday, January 27, 2013

Blueberry Crumble Bars

These beautiful looking bars stole the show this past week when I made them on Expresso. We were talking all things Indigo, as apparently, this is the hottest hue of the year for walls, decor and fashion. I can't recall blueberries actually ever being 'trendy' but if ever there was a time, now is as good as any. Being the only 'blue' fruit, it had very little competition vying for the spotlight, which is why I gave it a starring role in this recipe. 

The pastry is dead easy to make with just a little rubbing-in required from your fingertips. My grandmother always taught me to leave one hand clean and flour-free when baking incase the telephone rang or someone knocked on the door. And being as stubborn as I am, I never do, which thanks to Mr Murphy means that someone always calls at the exact point my hands touch the flour. Go figure. You could, of course, swop out the fruit for whatever is in season (strawberries, raspberries, peaches, plums etc.) though they won't lend the stunning inky contrast the blueberries do.


Blueberry Crumble Bars
Makes 30

1 cup sugar
1 tsp baking powder
3 cups cake flour
large pinch of salt
zest and juice from one lemon
225g butter cold and in cubes
1 egg
4 cups fresh blueberries
½ cup sugar
4 tsp corn flour

Combine the sugar, baking powder and flour with the salt and lemon zest and mix well.
Rub in the butter until the mixture is crumbly then stir in the egg to form a dough.
Divide the dough in half and press one half into a lined baking sheet so it’s about ½cm thick.
Stir together the lemon juice, blueberries, sugar and corn flour and sprinkle this over the dough layer.

Crumble the remaining dough over the berries and bake at 190C for 45 minutes or until golden brown. Allow to cool before slicing into squares.

Monday, January 14, 2013

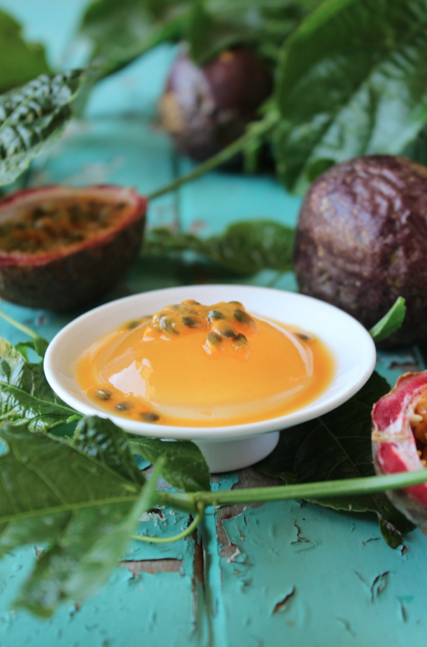
Passion fruit jellies


Most South Africans call them granadillas but how you can choose that over a beautiful name like 'passion fruit' is lost on me. The passion fruit is my absolute favourite. It's wrinkly leathery skin probably makes it one of the ugliest fruits but slice it open and the sticky sunshine-yellow flesh oozes out, begging to be married with flavours like coconut milk and pineapple. It's the flavour of summer and instantly transports me to a balmy tropical island. This passion fruit jelly is the best way to enjoy the fruit; it's simple enough to make the most of the fragrant tartness and highlight the beautiful black flecks of seeds without keeping you in the kitchen too long on a beautiful day. 


Passionfruit jellies
Serves 4

16 passionfruit, plus a few extra, for garnish
30ml passionfruit juice, plus extra if needed
4 sheets of leaf gelatine
150g castor sugar

Slice the passionfruit in half and scoop the flesh out into a bowl. Strain the mixture, pressing to extract all the juices and reserve the seeds. Measure the pulp and add enough passionfruit juice to make 200ml. 
Place the gelatine leaves in cold water until soft. 
Heat the sugar and 150ml water over low heat until dissolved then simmer for a few minutes. Squeeze the water from the gelatine and add to the hot sugar syrup. Stir until completely dissolved then stir in the passion fruit mixture. Place a few of the passion fruit seeds in the bottom of four jelly moulds then pour in the passionfruit mixture. You could also set the jelly straight into the passion fruit shells. Refrigerate until set. 
To unmould, briefly dip into boiling water. Serve with an extra drizzle of passionfruit pulp. 


Thursday, December 20, 2012

How to make a gingerbread house

I've always been a bit of an overachiever but this past week, I seriously outdid myself. I made two gingerbread houses in one week. Even saying that sentence exhausts me but oh what fun I had! This is not one of those posts where I promise (and cross my heart) that this is a simple recipe that you can throw together in 20 minutes flat blah blah blah. Be warned; baking a gingerbread house is not for the faint-hearted. These cute little edible cottages exist (and are made) for the sole purpose of satisfying your inner child. Who hasn't dreamed of being Hansel or Gretel and discovering a huge edible house made of sweets? No one, that's who. It's one of the fairytales we can actually come close to creating in our kitchens. And it's even more fun if you prepare the pieces and then get your kids involved (if you don't have your own, borrow some) and let your imaginations run wild. If I made one of these again, I'm definitely going to make a seaside gingerbread cottage - more South African you cannot get! Oh and did I mention that it makes a show-stopper of a table centrepiece for Christmas dinner? Put a candle or fairy lights inside for some twinkle and you're good to go. So, I do urge you to make one (just one!) if not for any other reason but so you can say you did. 

 Cedric the Snowman showing off his posh palace


Styling and photography by Katelyn Williams

Gingerbread house
Serves 10-12

150g butter
½ cup demarera sugar
2/3 cup golden syrup
1 egg
3 cups cake flour, sifted
1 tbsp corn flour
1 tsp baking powder
½ tsp bicarbonate of soda
1 tbsp ground ginger

Icing
4 cups icing sugar
3 egg whites
½ tsp cream of tartar
variety of sweets to decorate


Preheat oven to 180C. Place the butter, sugar and golden syrup in an electric mixer and beat for 5 minutes or until pale and creamy. Add the egg and beat until well combined. Add the flour, cornflour, baking power, bicarbonate of soda and ginger and mix until a smooth dough forms. Add a little more flour if necessary. Roll the dough out to ½ cm thick and using the templates, cut the parts of the gingerbread house out with a knife. Place on a lined baking sheet and bake for 10-15 minutes or until dark golden.
To make the icing, place the sugar, whites and cream of tartar in the bowl of a mixer and beat for 4-5 minutes or until light and fluffy. Place the icing in a piping ready to assemble the house. To assemble the house, cut each gingerbread sheet in half. Set aside four halves (two for the walls and two for the roof). From the remaining two halves, cut two even triangles from the top to create the side walls. Secure one of the rectangles and one of the side walls to a cake board with the icing and allow to dry. Support the walls against a tall jar or vase. Secure the other walls using the icing and allow to dry completely before the next step. Using icing, secure each of the roof pieces to the sides of the house and allow to dry completely.
Use the icing to decorate the rest of the house using sweets.